
In part one of this series, I shared some insight on how beginners can get started with the Revit API. In summary, I made two recommendations:
1. If you don’t know how to code, use Dynamo
2. If you know how to code, start with Revit Macros
In this post, we’ll cover option #1 and learn some basics on how Dynamo can help you tap into the Revit API without writing a single line of code. It goes without saying that the best way to learn Dynamo is to dive in and learn by doing. Note that this tutorial assumes you are already familiar with Dynamo to the point where you can insert and connect nodes. If you need a refresher on some of basic terminology and usage, have a look at our post from last year which can help you get caught up quickly. Don’t worry about reading up on the Revit API itself, we can save that for part three of this series!
With all of that being said, let’s start with a sample graph that will write “Hello world!” as text in a Revit project.
Your First Dynamo Graph: Hello World
In software development, it is customary to provide sample code to help new users understand how to work with an API. Dynamo is no different, but being a visual scripting tool a screenshot is worth a thousand lines of code. Have a look at the completed graph in the image below. This graph is all you need to create our “Hello world!” text note on a view.
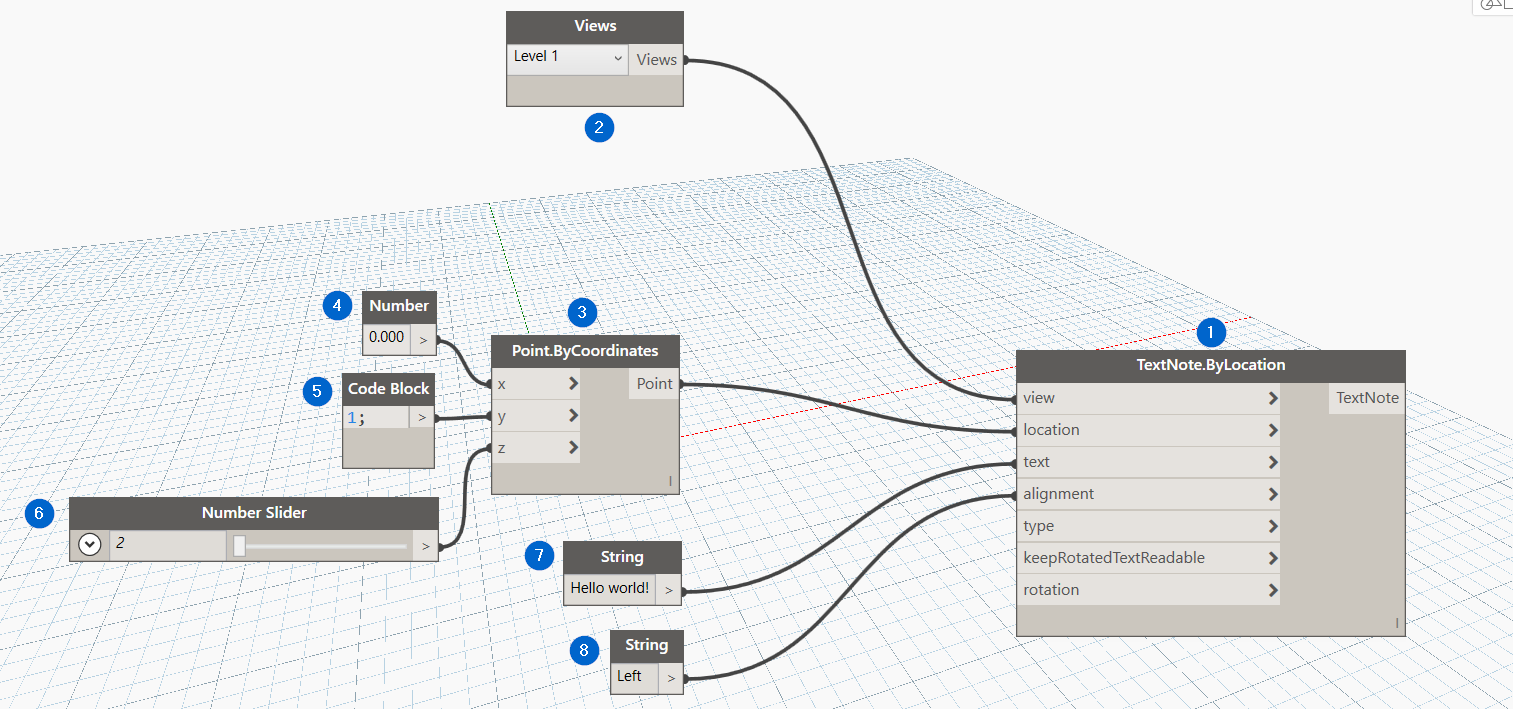
What do each of these nodes do?
1. TextNote.ByLocation – This node does all of the work. It will place a text element in the view that you choose. The node has several inputs, but for this example we will only use the first four inputs. Note that if you were creating a text note using the Revit API, the TextNote.Create() method would be used and has parameters that are similar to the inputs of this node.
2. Views – This node’s drop down menu is automatically populated with all of the views in your current project. Choose any view in your active model for this example, as long as your Text Notes model category is visible.
3.Point.ByCoordinates – This node outputs a Point object based on the x, y, z inputs. For this example, I’ve shown three different nodes that you can use to pass number values to another node. Refer to 4, 5, and 6 below. The result is a point with cartesian coordinates. This is where Dynamo tells the Revit API where you would like the text note to be placed on your view.
4. Number – Enter a number to output the value as a number data type
5. Code Block – By simply inputting a number and semicolon in this node, the Code Block node will default to outputting a number data type. Note that Code Blocks are extremely powerful and can contain several lines of code, however for the sake of today’s example we are using it’s most simple form, outputting a number value.
6. Number Slider – The number slider gives users the ability to use a slider to adjust the number that is output.
7. String – The value in the String node goes into the “text” input for the content of the text note element in the Revit view. The output is a string data type, meaning it is a set of characters which can include spaces, numbers, and special characters (e.g., a word or sentence).
8. String – The same node as above, except the output of this String node should be connected to the “alignment” input.
Right about here, you’re probably expecting a link to download the completed graph. Well, in an effort to help you truly get the hang of using Dynamo, I’d like to challenge you to recreate it yourself. Refer to the image and start building – Good luck!
Experiment and Try to Create Something Useful
Once you have the “Hello world!” graph functioning and you fully understand the concept of inputs, outputs, and data types, I encourage you to have a look at some of the other nodes included with Dynamo that use the Revit API to place 3D elements within the model. I think you’ll be surprised at how far the fundamentals taught in this tutorial will take you while on your journey to learn Dynamo.
Coming Up Next
Be sure to check out part three of this series, which will demonstrate how to use C# to tap into the Revit API. We’ll learn how to use the built-in macro manager and SharpDevelop (Revit’s IDE) to add a “Hello world!” text note to a view.