Revit Macros and C#: A Quick-Start Revit API Guide For Beginners Part 4

Welcome to the final post in our series dedicated to helping you get started with the Revit API. In last week’s post, I introduced you to Revit macros and how you can use them to get started on easily tapping into the Revit API using C#. For this post, we’ll continue modifying that macro and add a method that creates a text note in the active view of your current project that says “Hello world!”

Start by opening up last week’s Revit project where we created our macro.

Modifying an Existing Macro

To being editing an existing macro, simply navigate to the Manage Tab > Macro Manager.

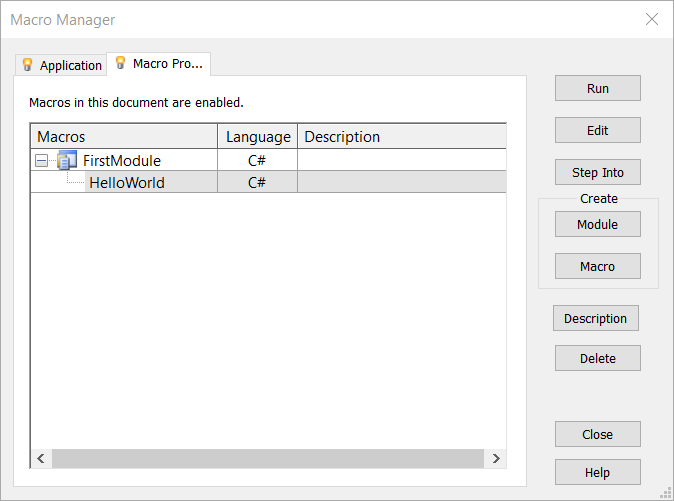
Within the Macro Manage Window, select the module or macro that you would like to edit and click the Edit button. Notice that the SharpDevelop window opens and you’ll again see the default code that was automatically generated by the macro manager when we created this macro.

Just Add Code

Now that we’re all caught up, I’d like to share the code for the HelloWorld method. Remember, this method will replace the method at line 39 in yesterday’s post and all the tasks that this method is meant to perform needs to be within the curly braces.

[code language="csharp"]
        public void HelloWorld()
        {
            // Get the active view of the current document.
            // http://www.revitapidocs.com/2018/043960ac-dde4-0f45-249f-8161646a4362.htm
            Autodesk.Revit.DB.View view = this.ActiveView;
            
            // Create XYZ object at coordinates x=0, y=0, z=0
            // http://www.revitapidocs.com/2018/c2fd995c-95c0-58fb-f5de-f3246cbc5600.htm
            XYZ noteCoordinates = new XYZ(0, 0, 0);
            
            // Create string object for text note
            // http://msdn2.microsoft.com/en-us/library/s1wwdcbf
            string content = "Hello world!";
            
            // Create a transaction so that we can modify the model
            // http://www.revitapidocs.com/2018/308ebf8d-d96d-4643-cd1d-34fffcea53fd.htm
            Transaction trans = new Transaction(this.Document, "Add text note");
            
            // Start the transaction
            trans.Start();
            
            // Get text note type by name
            ElementId textNoteTypeId = GetTextTypeIdByName(this.Document, "3/32\" Arial");
            
            // Create text options from text note type ID
            TextNoteOptions textNoteOptions = new TextNoteOptions(textNoteTypeId);
            
            // Create text note in view
            TextNote newTextNote = TextNote.Create(this.Document, view.Id, noteCoordinates, content, textNoteTypeId);
            
            // Commit the transaction change
            trans.Commit();
        }
[/code]

As you’re reading through the code block above, pay attention to the comments that I’ve added; they’re the lines in green which start with two slashes. In general (and this applies to any time you’re writing code) comments have no effect on the program itself and are only added to help anyone reading the source code in the future, including the future you!

I’ve added a comment at nearly every line to help you understand exactly what the macro is doing following the comment. Included in these comments are URLs to specific pages on RevitApiDocs.com. On a side note, this website will prove to be your best friend as you’re leaning the Revit API because it makes the task of sifting through the Revit API documentation much less painful. It’s worth also noting that you should start getting used to the process of wading through pages and pages of documentation, as this is fairly typical when working with any API.

Helper Method

Aside from the code that is within the HelloWorld method, this macro also relies on a “helper method”. A helper method essentially helps another method perform a task. Occasionally, developers will break out code into helper methods when the smaller tasks can make the main macro method less readable.

Below is the code for the helper method that I created for this tutorial. You can add this code to the ThisDocument.cs file and ensure that it is outside of the HelloWorld method curly braces.

[code language="csharp"]
        public static ElementId GetTextTypeIdByName(Document doc, string name)
        {
            ElementId textId = null;

            // Collect all text note types
            FilteredElementCollector collector = new FilteredElementCollector(doc);
            ICollection textNoteTypes
                = collector.OfClass(typeof(TextNoteType))
                  .ToElementIds()
                  .ToList();

            // Get text note types as elements
            List elements = new List();
            foreach (ElementId noteId in textNoteTypes)
            {
                elements.Add(doc.GetElement(noteId));
            }

            // Get the text note type element ID by name
            foreach (Element e in elements)
            {
                if (e.Name == name)
                    textId = e.Id;
            }

            return textId;
        }
[/code]

The helper method could have easily been added to the macro’s HelloWorld method, however for the sake of this example it is worth demonstrating that all of your code for Revit macros never have to live entirely within a single method. These helper methods can be reused across multiple macros as well, so keep that in mind as you’re writing your code.

The Complete Code

I realize that the code blocks above can be slightly confusing for beginners, so here is the macro in its entirety for those of you who would like to paste in the entire code to ThisDocument.cs:

[code language="csharp"]
/*
 * Created by SharpDevelop.
 * User: Jay Merlan
 * Date: 3/12/2019
 * Time: 7:07 AM
 * 
 * To change this template use Tools | Options | Coding | Edit Standard Headers.
 */
using System;
using Autodesk.Revit.UI;
using Autodesk.Revit.DB;
using Autodesk.Revit.UI.Selection;
using System.Collections.Generic;
using System.Linq;

namespace FirstModule
{
    [Autodesk.Revit.Attributes.Transaction(Autodesk.Revit.Attributes.TransactionMode.Manual)]
    [Autodesk.Revit.DB.Macros.AddInId("11B5DF7E-A80F-4038-88EA-7E3F9E2AEF9A")]
    public partial class ThisDocument
    {
        private void Module_Startup(object sender, EventArgs e)
        {
            // This method is called when a module is loaded
        }

        private void Module_Shutdown(object sender, EventArgs e)
        {
            // This method is called when a module unloads
        }

        #region Revit Macros generated code
        private void InternalStartup()
        {
            this.Startup += new System.EventHandler(Module_Startup);
            this.Shutdown += new System.EventHandler(Module_Shutdown);
        }
        #endregion
        public void HelloWorld()
        {
            // Get the active view of the current document.
            // http://www.revitapidocs.com/2018/043960ac-dde4-0f45-249f-8161646a4362.htm
            Autodesk.Revit.DB.View view = this.ActiveView;
            
            // Create XYZ object at coordinates x=0, y=0, z=0
            // http://www.revitapidocs.com/2018/c2fd995c-95c0-58fb-f5de-f3246cbc5600.htm
            XYZ noteCoordinates = new XYZ(0, 0, 0);
            
            // Create string object for text note
            // http://msdn2.microsoft.com/en-us/library/s1wwdcbf
            string content = "Hello world!";
            
            // Create a transaction so that we can modify the model
            // http://www.revitapidocs.com/2018/308ebf8d-d96d-4643-cd1d-34fffcea53fd.htm
            Transaction trans = new Transaction(this.Document, "Add text note");
            
            // Start the transaction
            trans.Start();
            
            // Get text note type by name
            ElementId textNoteTypeId = GetTextTypeIdByName(this.Document, "3/32\" Arial");
            
            // Create text options from text note type ID
            TextNoteOptions textNoteOptions = new TextNoteOptions(textNoteTypeId);
            
            // Create text note in view
            TextNote newTextNote = TextNote.Create(this.Document, view.Id, noteCoordinates, content, textNoteTypeId);
            
            // Commit the transaction change
            trans.Commit();
        }
        
        ///


        /// A helper method to return the element ID of a TextNoteType
        /// 

///The name of the text note type. /// The Element.Id of the TextNoteType. public static ElementId GetTextTypeIdByName(Document doc, string name) { ElementId textId = null; // Collect all text note types FilteredElementCollector collector = new FilteredElementCollector(doc); ICollection textNoteTypes = collector.OfClass(typeof(TextNoteType)) .ToElementIds() .ToList(); // Get text note types as elements List elements = new List(); foreach (ElementId noteId in textNoteTypes) { elements.Add(doc.GetElement(noteId)); } // Get the text note type element ID by name foreach (Element e in elements) { if (e.Name == name) textId = e.Id; } return textId; } } } [/code]

If You Build It, It Will Run

The final step for creating a Revit macro is building the solution. This is where SharpDevelop compiles the code to be machine-readable and also looks for issues in our code. The IDE will notify us if there is a error in the code will attempt to specify what is preventing the IDE from building the solution.

To build your solution, either press the F8 key on your keyboard or navigation to the Build Menu > Build Solution. If you don’t see any errors and the lower left corner of the SharpDevelop window says “Build finished successfully,” congratulations, you’ve now created your first Revit macro!

Errors

Below is an example of what it looks like for the IDE to catch an error while building the solution. Notice the error log tells you which line the error was caught (#93) and the description informs you of exactly what the error is. In this case, I was missing a semicolon at the end of line 93. In addition, you have the option to look up the error code that is in parenthesis (CS1002), where you can find even more information about that specific error online.

Once I added the semicolon to the end of line 93, I hit the F8 key on my keyboard, and the solution was built successfully!

Run Macro, Run!

Now that we’ve built our solution, we can return to the macro manager and run our macro. Simply select the macro in the macro manager and click the run button.

Welcome to the Revit API

Although this concludes our four-part series on getting started with the Revit API, this is only the beginning of your journey. From here, I recommend that you use these fundamentals and put some effort into learning how to model walls, duct, pipe, or other more complex model elements using the Revit API, whether you choose to use Dynamo or Revit macros.

Do you have a better way of writing “Hello world!” on a Revit view? Are you having trouble with following along this tutorial? Leave us a comment and let’s start up some discussion.